How to Deploy a Node.js App on AWS


Porter Standard brings the experience of a traditional PaaS hosting service to your own AWS cloud. You get the flexibility of running your own enterprise-grade infrastructure in your own VPC, without actually worrying about how it's provisioned or managed - you just have to bring your GitHub repository.
While there are many AWS services available to deploy a Node.js application, from Elastic Beanstalk and ECS to serverless options like Lambda and Fargate, Porter gives you the benefits of EKS, like scalability and high availability, without having to manage DevOps or know anything about Kubernetes at all. Porter and every EC2 instance the platform spins up are a comparable cost to Fargate, without any of the issues associated with a serverless hosting service, like cold starts.
In this guide, we're going to walk through using Porter to provision infrastructure in an AWS account, and then deploy a Node application and have it up and running.
Note that to follow this blog post, you'll need an account on Porter Standard along with an AWS account. While Porter itself, doesn't have a free tier, if you're a startup that has raised less than 5M in funding, you can apply for the Porter Startup Deal. Combined with cloud credits to cover the cost of AWS resources, you can essentially run your infrastructure for free. We also offer a two-week long free trial!
What we're deploying
We're going to deploy a sample Nodejs server written in Express.js - but that doesn't mean you're restricted to Express. You're free to use any and all JS frameworks. This app's a very basic Node application with two endpoints - / and a basic healthcheck endpoint at /healthz, to demonstrate how you can push out a public-facing app on Porter with a public facing domain and TLS. The idea here is to show you how a basic app can be quickly deployed on Porter, allowing you to then use the same flow for deploying your code.
You can find the repository for this sample app here: https:/github.com/porter-dev/nodejs-getting-started. Feel free to fork/clone it, or bring your own.
Getting started
Deploying an app from a Github repository on Porter using AWS involves - broadly - the following steps:
- Provisioning infrastructure inside your AWS account using Porter.
- Creating a new app on Porter where you specify the repository, the branch, any build settings, as well as what you'd like to run.
- Building your app and deploying it(automatically handled by Porter).
Connecting your AWS account
On the Porter dashboard, head to Infrastructure and select AWS.
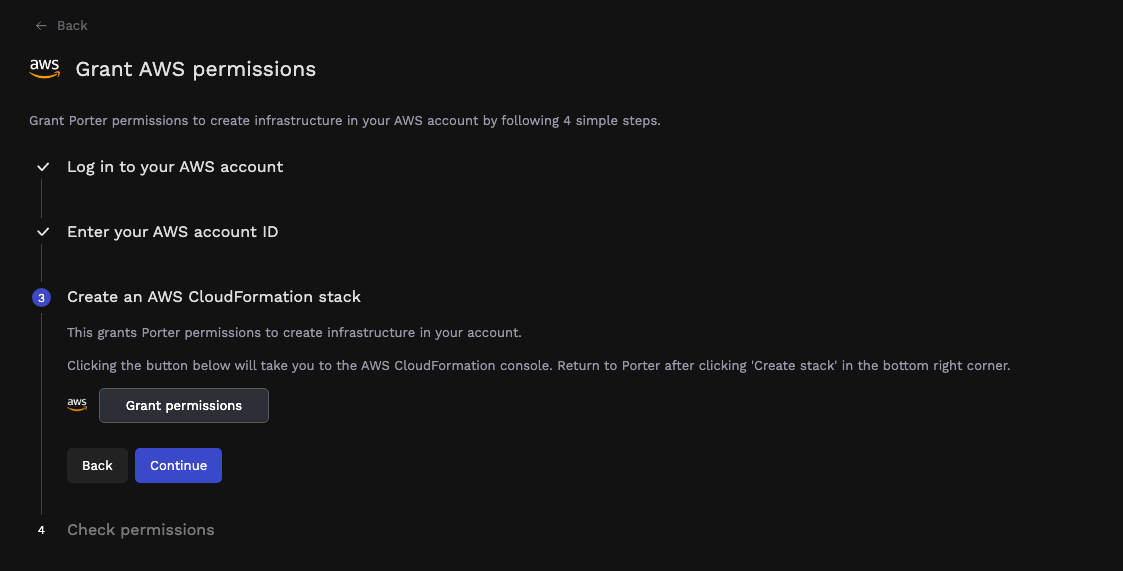
Here you're required to log into your AWS account and provide your AWS account ID to Porter. Clicking on Grant permissions opens your AWS account and takes you to AWS CloudFormation, where you need to authorize Porter to provision a CloudFormation stack; this stack's responsible for provisioning all IAM roles and policies needed by Porter to provision and manage your infrastructure. Once the stack has been deployed, it takes a few minutes to complete:


Once the CloudFormation stack's created on AWS, you can switch back to the Porter tab, where you should see a message about your AWS account being accessible by Porter:

Provisioning infrastructure
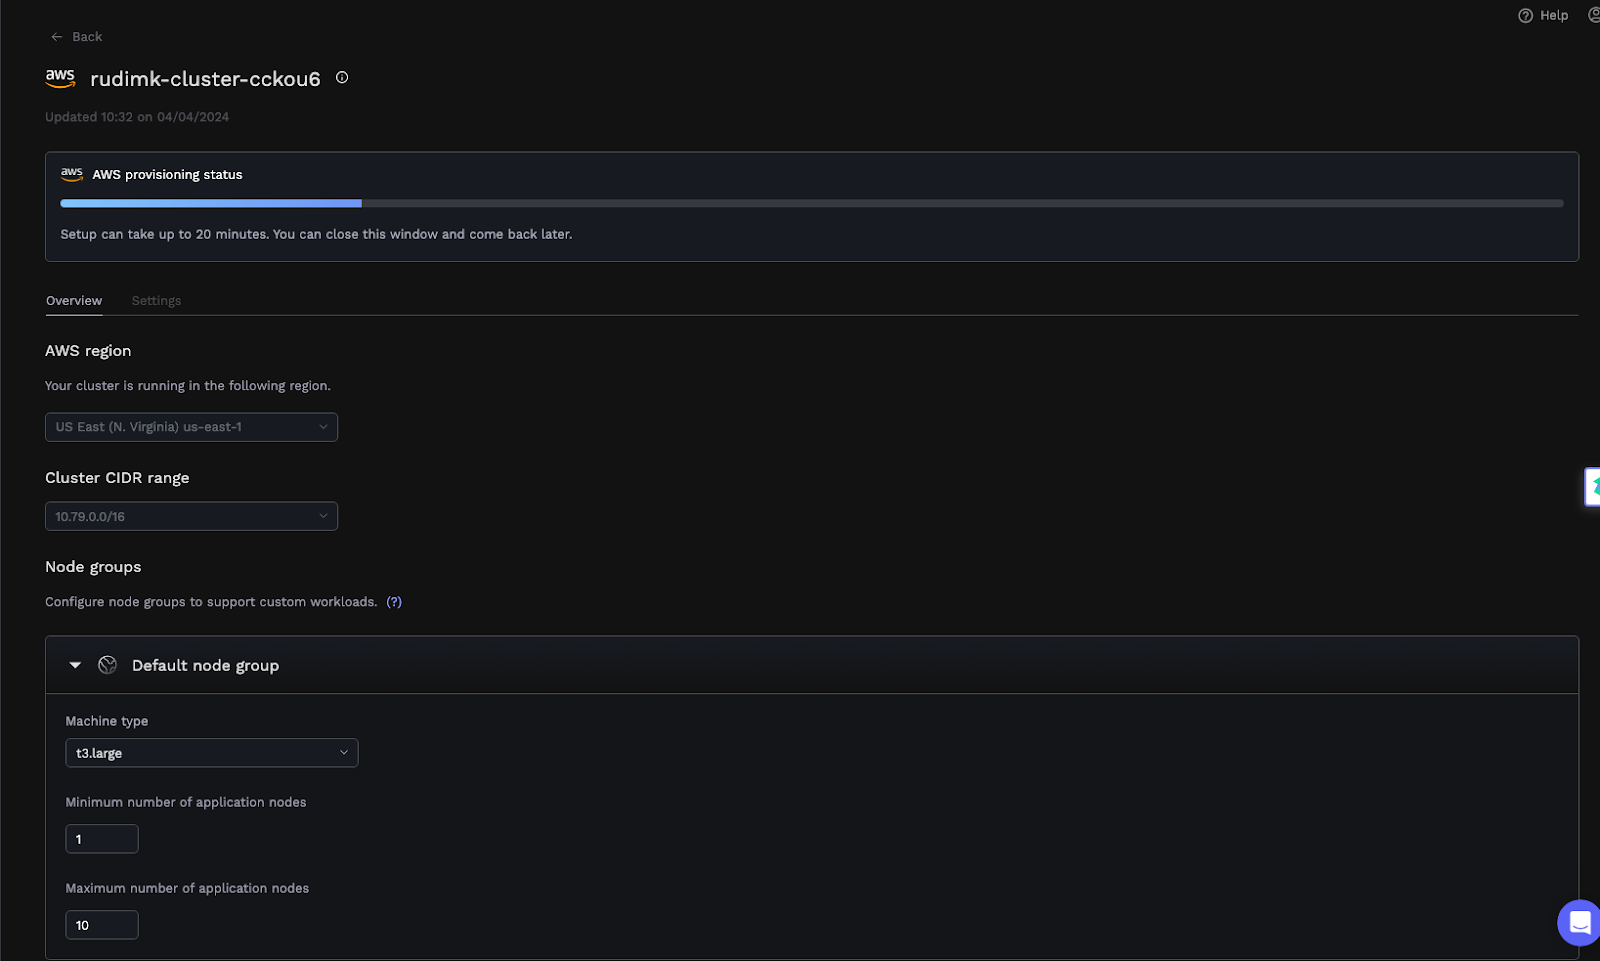
After connecting your AWS account to Porter, you'll see a screen with a form - the fields are pre-filled, with details about your EKS cluster:

Ordinarily, the only two fields that should be tweaked are the EKS cluster name and the region - feel free to change those. The other fields are usually changed if Porter detects a conflict between the proposed cluster's VPC and other VPCs in your account - these would be flagged during a preflight test, allowing you the option of tweaking those addresses. You can also choose a different instance type in this section for your cluster; while we tend to default to t3.medium instances, we support a lot more instance types. Once you're satisfied, click Deploy.
At this stage, Porter will run preflight checks to ensure your AWS account has enough quotas free for components like vCPUs, elastic IPs as well as any potential conflicts with address spaces belonging to other VPCs. If any issues are detected, these will be flagged on the dashboard along with troubleshooting steps.
Deploying your cluster can take up to 20 minutes, and Porter will also have access to your Elastic Container Registry. After this process, you won't really need to enter the AWS management console again to manage your web application.
Creating an app and connecting your Github repository
On the Porter dashboard, select Create a new application, which opens the following screen:

This is where you get to select a name for your app, as well as connect a Git repository which contains your code. Once you've selected the appropriate repository, select the branch you'd like to deploy to Porter. You can also deploy from a Docker registry.
If you already have your own CI/CD pipeline and maintain your own artifacts, like a Docker image, then the onus of setting up CI/CD is on you - if you’re looking for a more traditional, PaaS-like flow, you can just choose the repository you want to deploy and Porter will take care of CI/CD for you, using Github actions under the hood.
If you signed up for Porter using an email address instead of a Github account, you can easily connect your Github account to Porter by clicking on the profile icon on the top right corner of the dashboard, selecting Account settings and adding your Github account.
Configuring build settings
Porter has the ability to automatically detect what language your app's written in, and select an appopriate buildpack which can be used to automatically package your app for eventual deployment. Once you've selected the branch you wish to use, Porter will display the following screen:

You have the ability to further tune your build here - for instance, we're going to use the newer heroku/builder:22 buildpack for our app.
Deployment Pipeline: Configure services
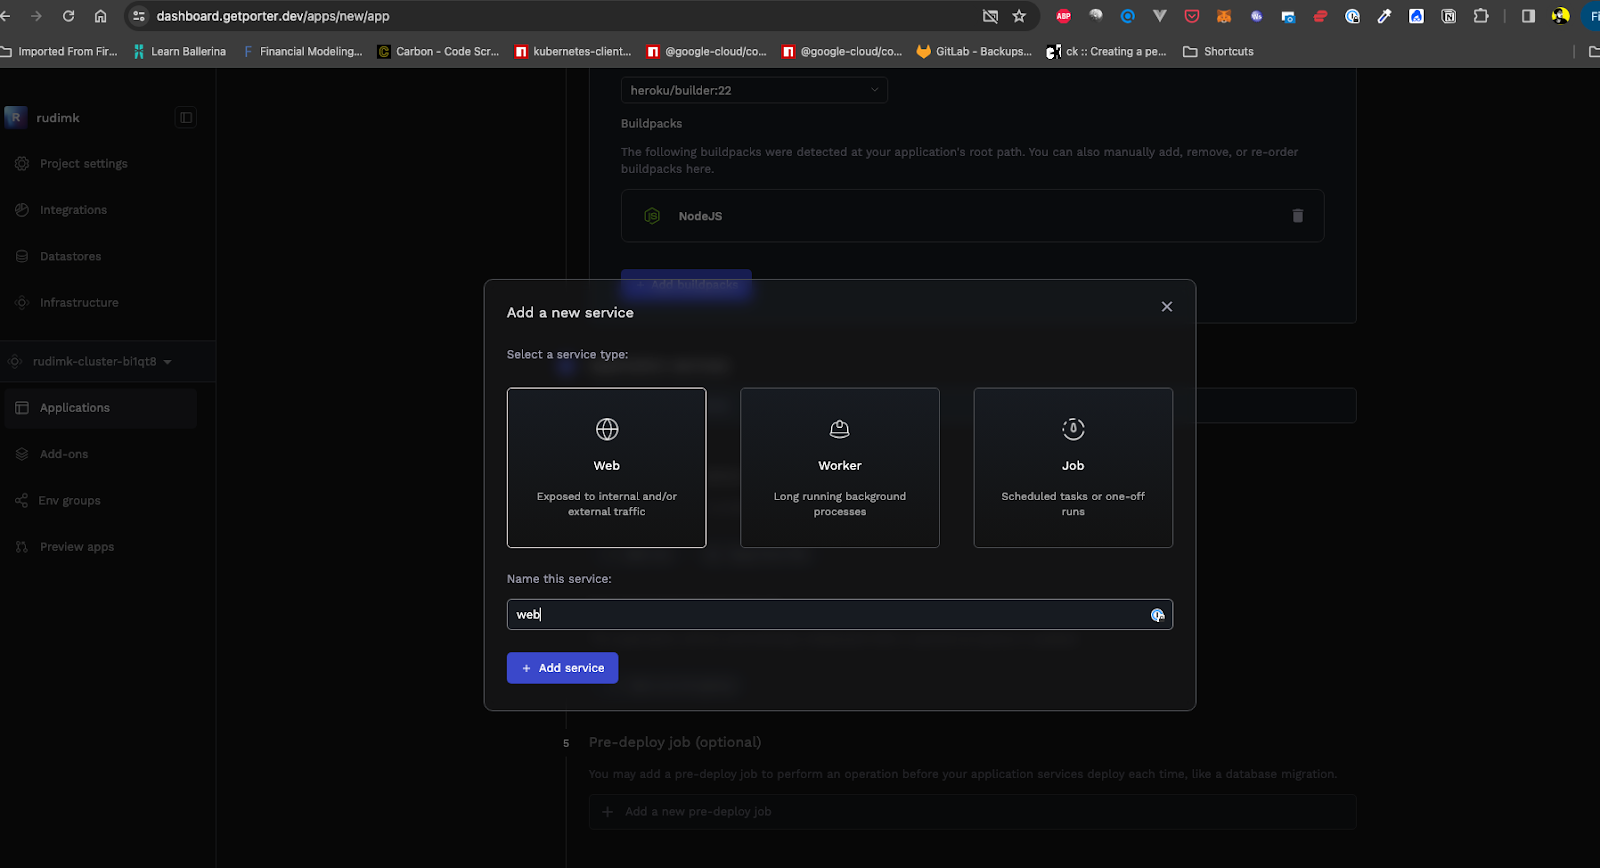
At this point, it's a good idea to take a quick look at applications and services. An application on Porter is a group of services, where each service shares the same build and the same environment variables. If your app consists of a single repository with separate modules for, say an API and a frontend and a background worker, then you'd deploy a single application on Porter with three separate services. Porter supports three kinds of services: web, worker and job services.
Let's add a single web service for our app:
Deployment Pipeline: Configure your service
Now that we've defined a single web service, it's time to tell Porter how this service runs. That means specifying what command to run for this service, what kind of CPU/RAM levels to allocate, as well as how this will be accessed publicly.

You can define what command you'd like Porter to use for running your app in the Main tab. This is required if your app's being built using a buildpack; this may be optional if you opt to use a Dockerfile(since Porter will assume you have an ENTRYPOINT in your Dockerfile and use that if it exists).
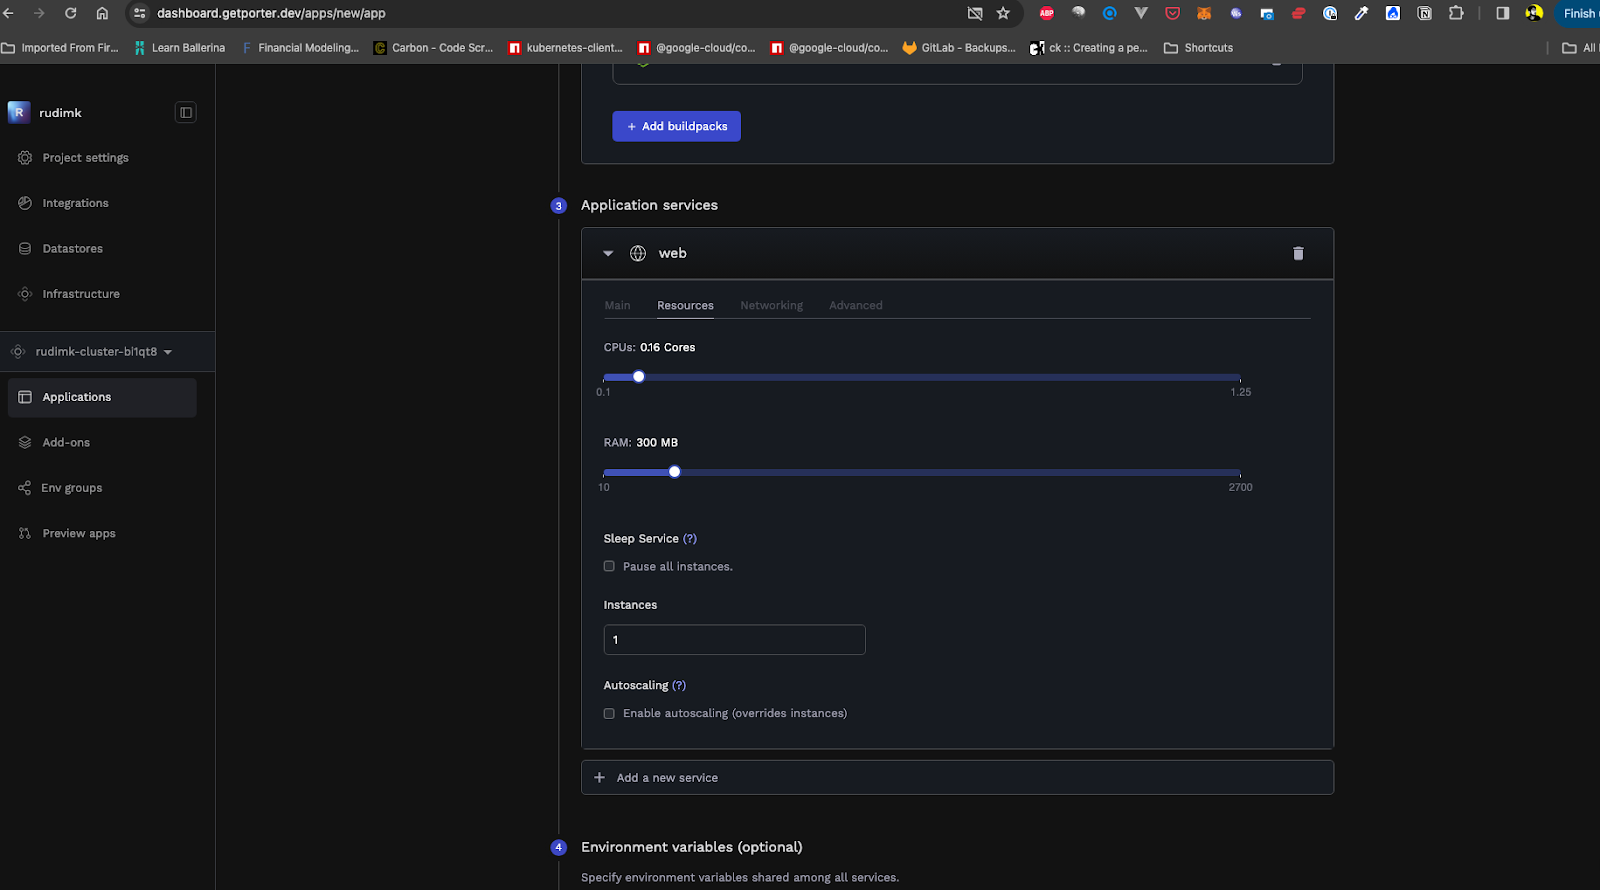
The Resources tab allows you to define how much CPU and RAM your app's allowed to access. Porter imposes a limit on the resources that can be used by a single app; if your app needs more, you can change the instance type being used in the Infrastructure tab.
In this section, you can also define the number of replicas you'd like to run for this app, as well as any autoscaling rules - these allow you to instruct Porter to add more replicas if resource utilization crosses a certain threshold.
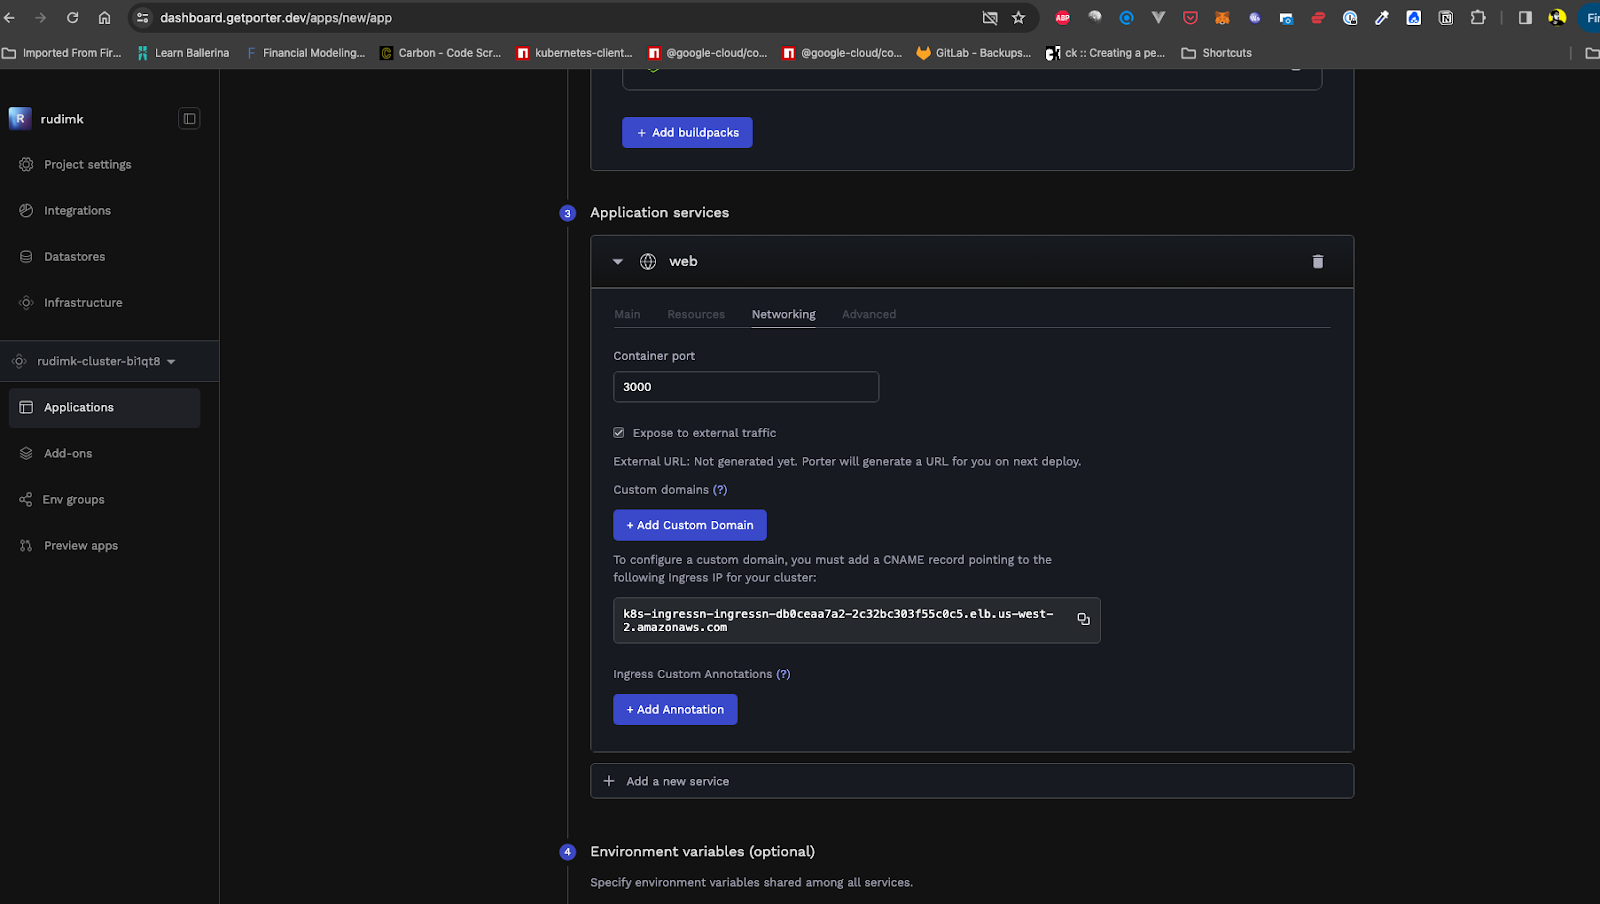
The Networking tab is where you specify what port your app listens on. When you deploy a web app on Porter, we automatically generate a public URL for you to use - but you can also opt to bring your own domain by adding a CNAME/A record to your DNS (Domain Name Service) records pointing your domain at Porter's public load balancer, and adding the custom domain in this section. This can be done at any point - either while you're creating the app, or later once you've deployed it.
If your app listens on localhost or 127.0.0.1, Porter won't be able to forward incoming connections and requests to your app. To that end, please ensure your app is configured to listen on 0.0.0.0 instead.
Deployment Pipeline: Review and merge Porter's PR
Hitting Deploy will show you the contents of a Github Action workflow that Porter would use to build and deploy your app:
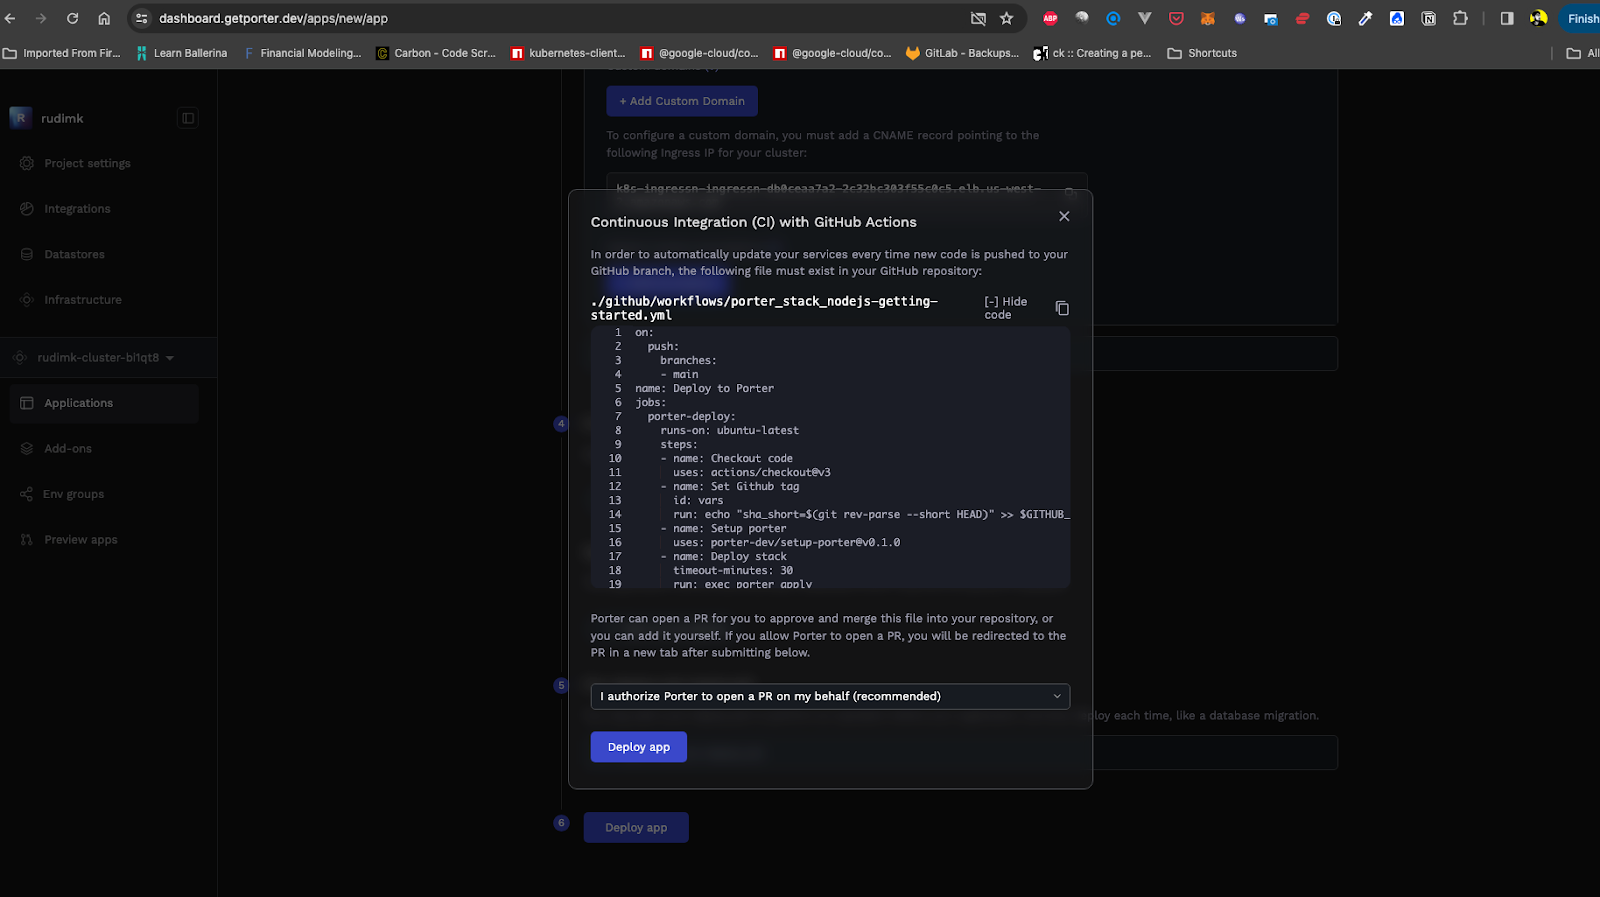
This Github Action is configured to run every time you push a commit to the branch you specified earlier - when it runs, Porter applies the selected buildpack to your code, builds a final image and pushes that image to Porter. Selecting Deploy app will allow Porter to open a PR in your repo adding this workflow file:

All you need to do - merge this PR and your build will commence.

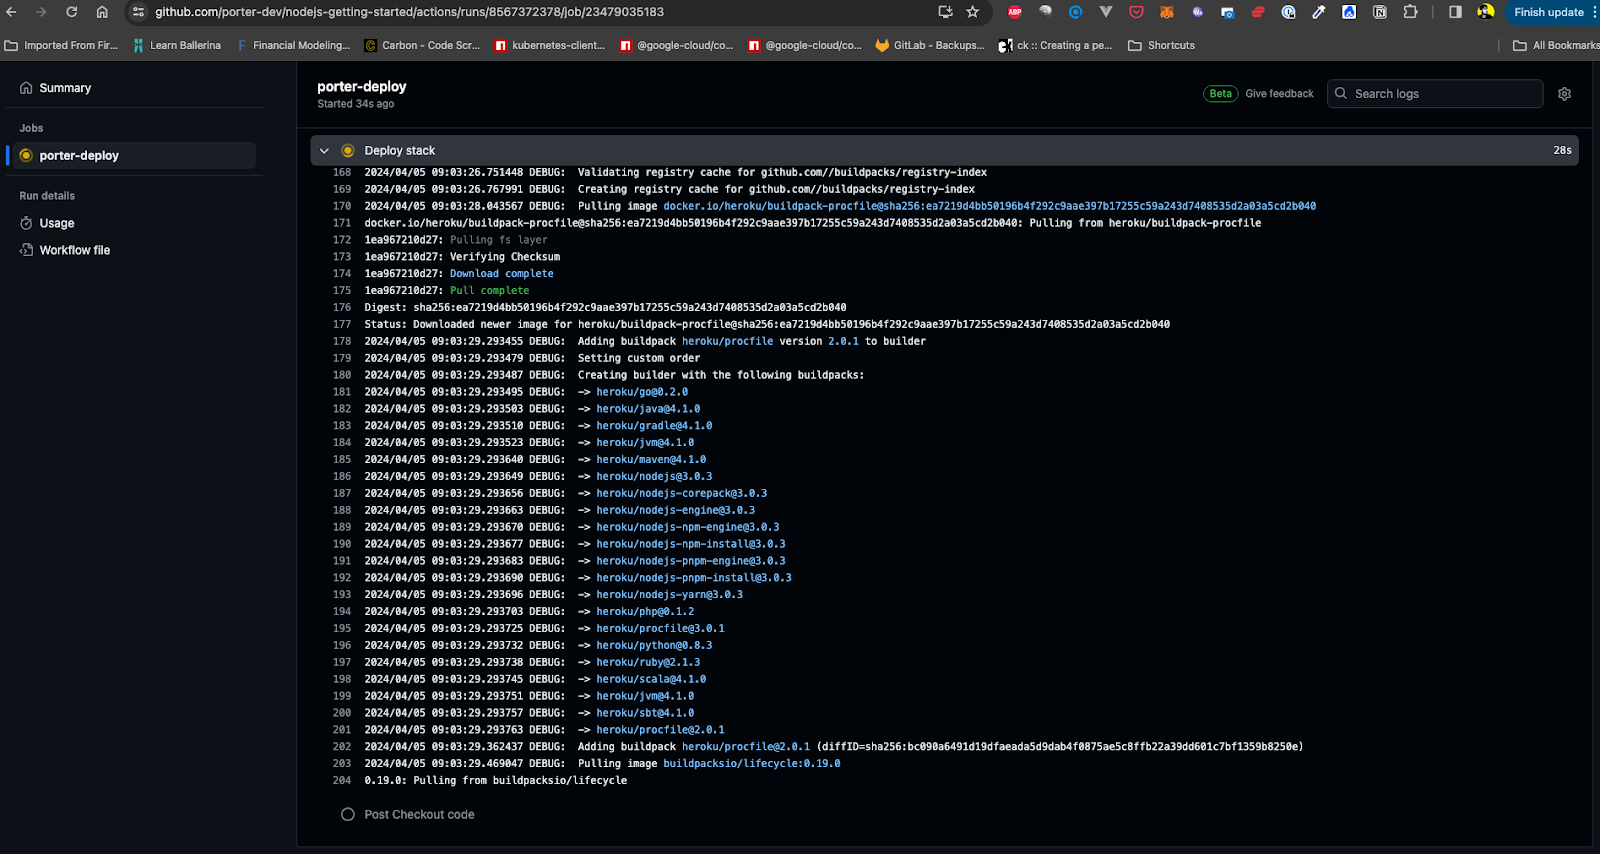
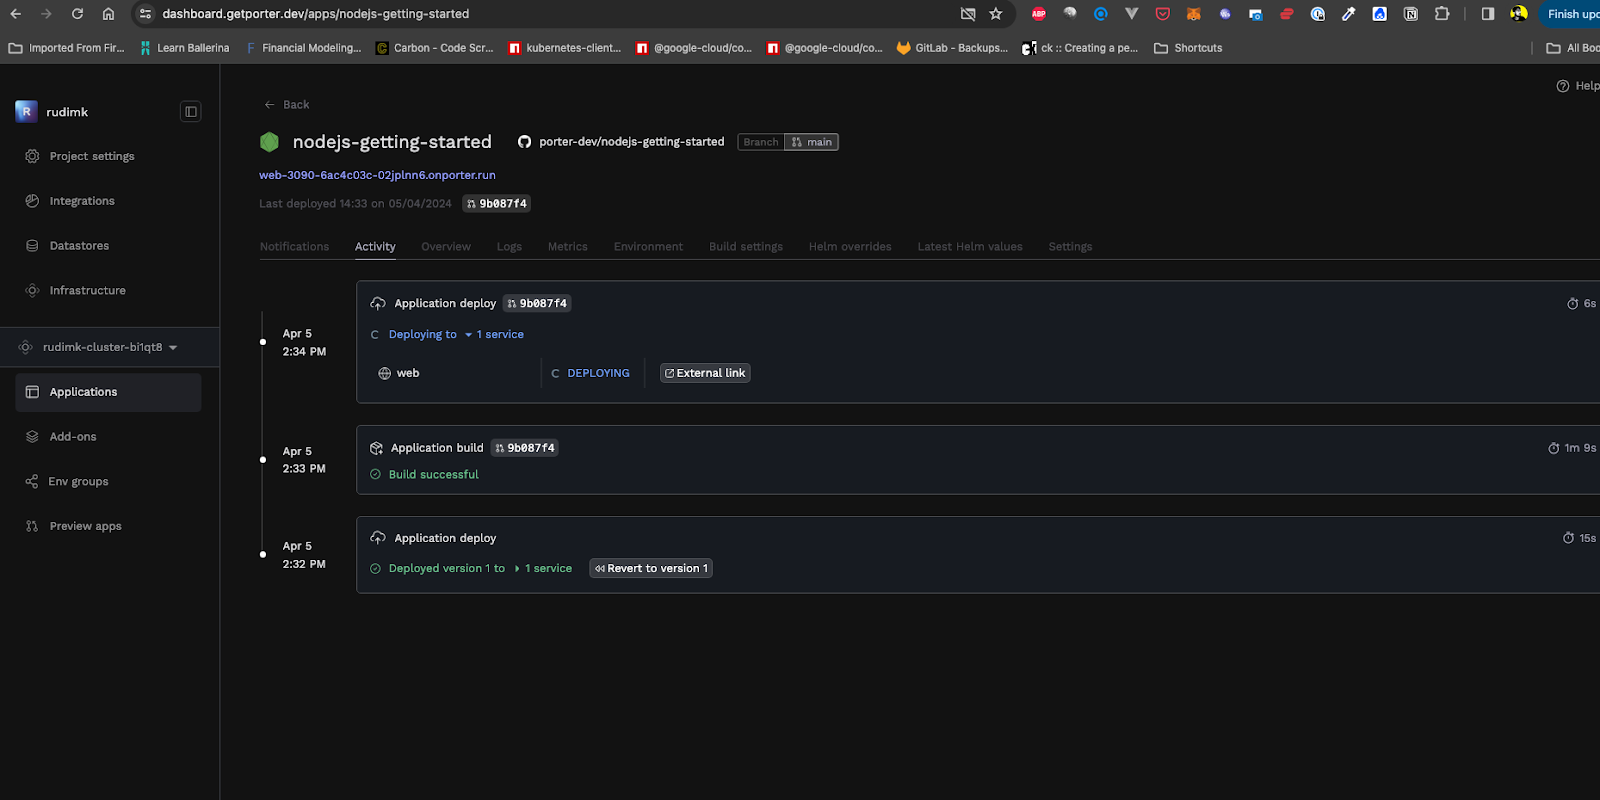
You can also use the Activity tab on the Porter dashboard to see a timeline of your build+deployment going through. Once the build succeeds, you'll also be able to see the deployment in action:

Accessing your App
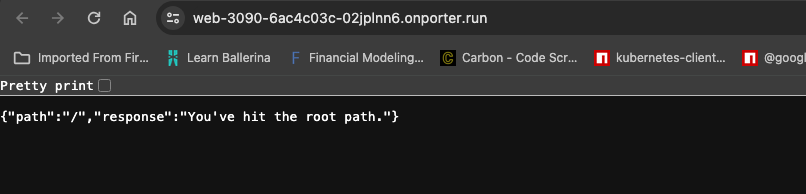
Your app's now live on Porter. The Porter-generated unique URL is now visible on the dashboard, under your app's name. Let's test it:
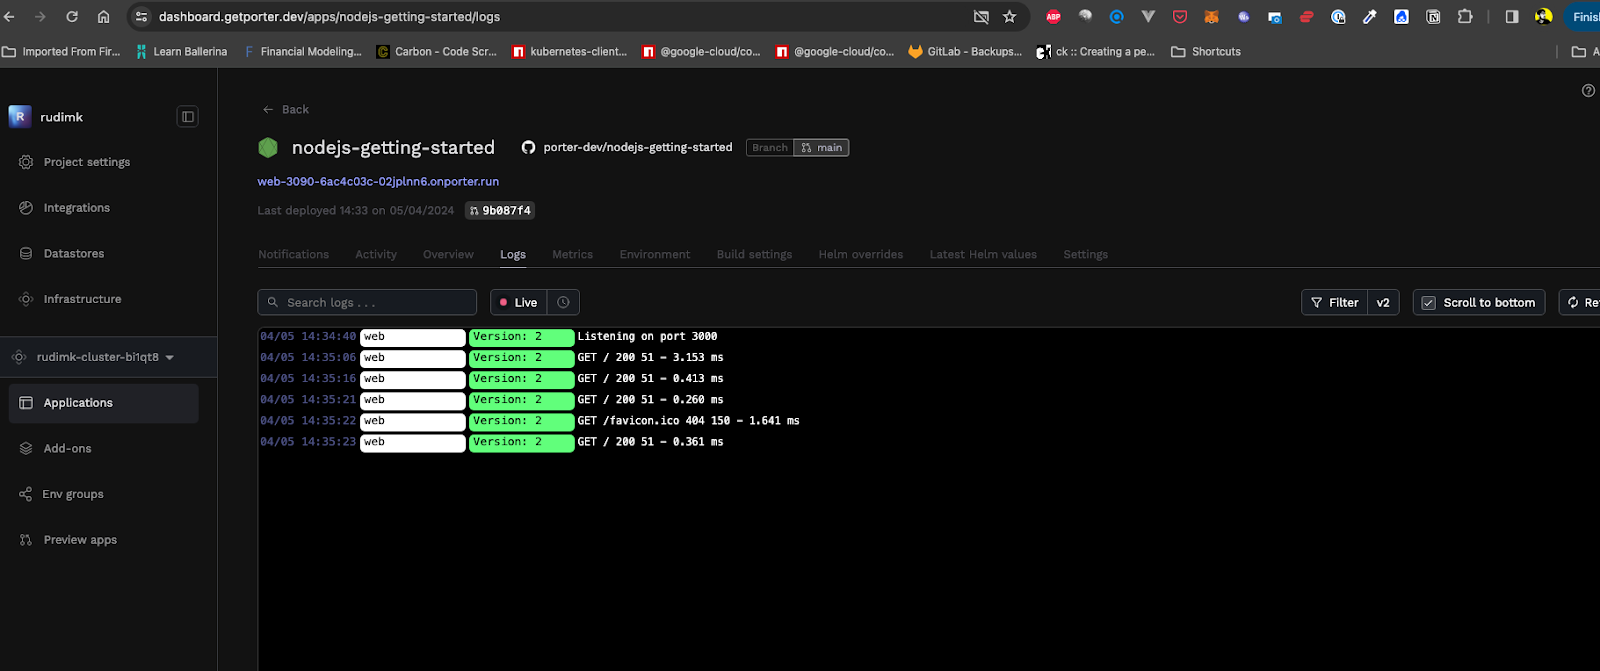
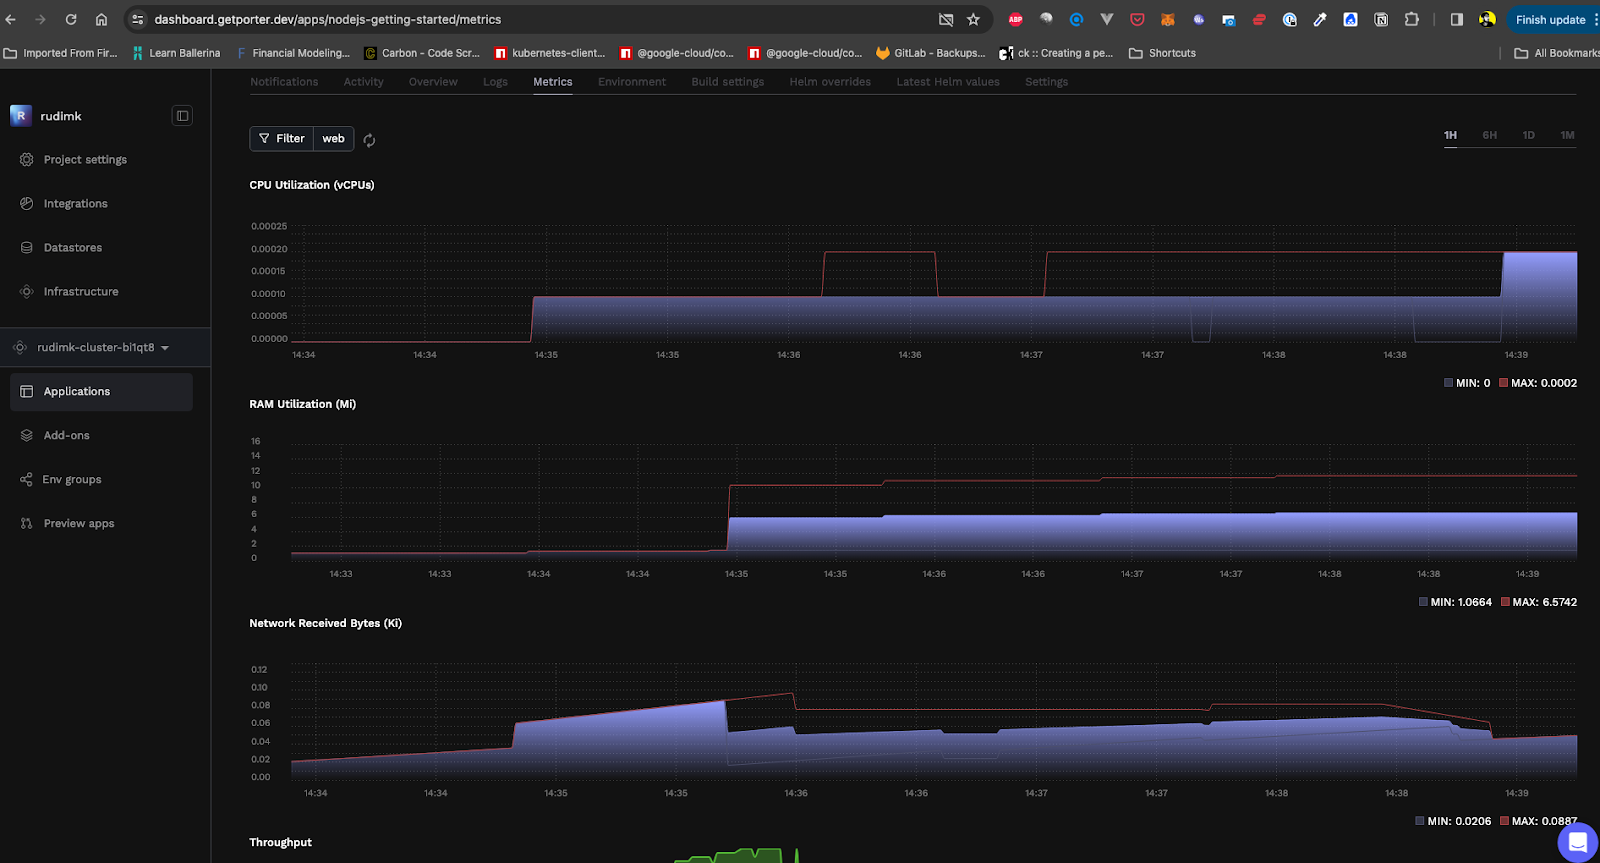
You can also check logging and monitoring in the form of app logs and resource consumption metrics on the dashboard, to see how your Nodejs application’s faring:
Exploring Further
We've seen how you can go about deploying your Nodejs app on Amazon Web Services using Porter, without choosing an Amazon Machine Image, without having to configure an auto scaling group or security groups, and certainly not having to configure NGINX reverse proxy as a load balancer, and certainly not having to use Infrastructure as Code tools like Terraform.
You can also create production data stores on Porter, including a Postgres database like Amazon RDS or Aurora. Although it’s simply the AWS-managed RDS instance being created, Porter will take care of VPC peering and networking conflicts (so IP range and CIDR range conflicts don’t occur) and provide you with an environment group you can inject into your application so your app can talk to that RDS instance.
Here are a few pointers to help you dive further into configuring/tuning your app:
- Adding your own domain.
- Adding environment variables and groups.
- Scaling your app (Porter takes care of auto scaling).
- Ensuring your app's never offline (we’ll renew and manage the SSL certificate for you).
More Blog Posts


Subscribe to our newsletter
